GitHub Copilot CLI is now in public preview, bringing AI-powered terminal assistance to developers. This agentic tool enables building, debugging, and understanding code directly from the command line. Available on Linux, macOS, and Windows (experimental), it requires Node.js v22+ and an active Copilot subscription. Let’s learn how to access it and use it in this blog.
Key Features of GitHub Coding Agent
- Terminal-Native Development: Eliminates context-switching; you never have to leave the command line.
- Seamless GitHub Integration: Authenticates with your existing GitHub account to access and manage repositories, issues, and pull requests using natural language.
- Agentic Intelligence: Goes beyond simple suggestions. It can plan and execute complex tasks like building, editing, debugging, and refactoring code.
- MCP-Powered Extensibility: Ships with GitHub’s own MCP (Model Context Protocol) server and supports custom servers, allowing you to connect new data sources and tools to extend its capabilities.
- Full User Control & Safety: A “preview-and-approve” model ensures you see every proposed action before it is executed, giving you explicit control.
How to Access GitHub Copilot CLI?
Before proceeding with the installation, ensure that the system requirements are satisfied.
System Requirements for GitHub Copilot CLI (Public Preview)
- Operating System: macOS 12+, Ubuntu 20.04+, Windows 11 (via WSL2)
- Node.js Version: 22 or newer (LTS recommended). You can install Node.js by following the instructions on its official page: https://nodejs.org/
- npm: Required (comes with Node.js)
- Git: Optional but recommended
- RAM: 4 GB minimum, 8 GB recommended
- Internet: Required
Installation Steps for GitHub Copilot CLI (Public Preview)
1. Check Node.js version:
node --version #Ensure that it is version 22 or higher.2. Install GitHub Copilot CLI:
npm install -g @github/copilot3. Launching the CLI:
copilot
After this, use /login to log in to your GitHub account, and after that we are good to use GitHub Copilot CLI (Public Preview)
Now you are all set to use GitHub Copilot CLI. Let’s get started!
Task 1: Building a Game on a Local Host
Goal: Build a 2D arcade shooter with enemies and scoring
Create a simple 2D space shooter game using JavaScript and HTML5 canvas (or Python Pygame if preferred). The game should display a spaceship controlled by the player with keyboard arrow keys for movement and the spacebar for shooting. Enemies should spawn at the top and move downward at random intervals. Implement collision detection so bullets destroy enemies and increase the score. Add a basic game-over condition if enemies collide with the player’s ship. Use pixel-art style graphics and ensure smooth animations.
Clearly, GitHub Copilot was able to create almost a fully defined 2D space shooter. As I observed, it outputted code that was precise, clear, and with great graphics details. It provided implementation for player controls, enemy spawning, collision detection, and scoring – all presented in an organized way that was easy to follow. Almost every time, it ran in under one second with only very small tweaks. This was a pleasant surprise.
The refined visuals, pixelated artwork, and smooth animation made the game feel very polished, despite it being quite simple. The biggest highlight was GitHub Copilot’s ability to turn natural language prompts into a fully functional, interactive prototype. Game-over logic, score tracking, messages on the screen, everything was functioning beautifully, showing the strength of Copilot in both logic and presentation.
Task 2: Building a Daily Calorie-tracing Application
Goal: Build an interactive dashboard with charts and user input.
Develop a fitness tracker dashboard using HTML, CSS, JavaScript, and a charting library (like Chart.js). Allow the user to log daily steps, calories burned, and hours slept. Display this data in real-time on dynamic charts (bar chart for steps, line chart for calories, pie chart for sleep distribution). Add a weekly summary section that calculates averages and highlights the best/worst day. Include a simple local storage mechanism so user data persists across page refreshes. Style the dashboard with a clean, modern UI.
Final Output:
GitHub Copilot provides the most relevant and feature-enriched implementation. Chart.js was integrated well and displayed responsive bar, line, and pie charts while updating in real time. The weekly summary section calculated averages effectively, with best and worst days clearly presented. Copilot also effectively managed local storage to enable persistence between sessions, whilst styling the dashboard with a clean, modern interface. The colours were attractive and vibrant, and the only limitation was that you were unable to save past data, which made sense in context.
Task 3: Building a Sentimental Analysis Model Workflow
Goal: Analyze text data for insights.
Prompt:
“Perform sentiment analysis on a dataset. Implement this in a Jupyter Notebook. Start by cleaning the text (remove stopwords, punctuation, and apply tokenization). Use a pre-trained sentiment analysis model (e.g., from Hugging Face Transformers or TextBlob). Compare model predictions with actual ratings and calculate accuracy. Visualize the distribution of positive, neutral, and negative sentiments using charts. End with at least three insights about how customer ratings align (or misalign) with the sentiment analysis model.”
Output:
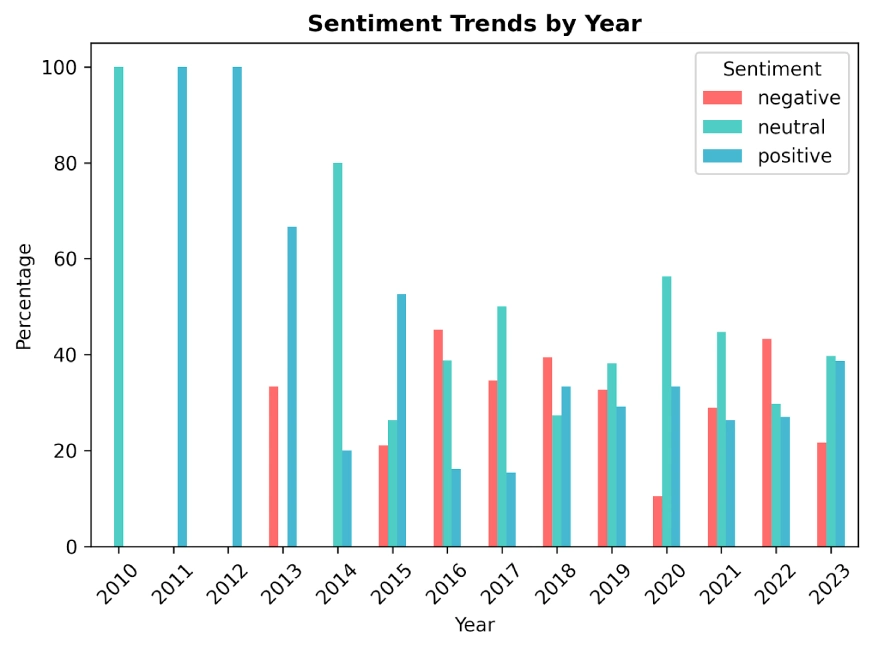
GitHub Copilot gives a clear and methodical workflow for sentiment analysis, which streamlined the critical steps (text-cleaning, tokenizing, model integration) which made the process streamlined, efficient, and reliable. The predictions could be cleanly compared against actual ratings, and accuracy measures could be inherently calculated with little effort; it even generated sentiment-distribution graphs that were saved for later review, providing strong visualization. Everything ran well with one minor issue presented with the print statement, just venting about execution, demonstrating how Copilot was able to embed logical flow with practical implementation.
You can find the complete code from here and download the dataset from Kaggle.
We have recently tried the GPT-5 Codex (read the full comparison here). At the time, while previous versions of Codex were fast and clear, GPT-5 Codex brings major improvements with agentic autonomy, handling bug fixes, refactoring, visualization, and workflows with minimal intervention. In this blog, I have used the same prompts that are used for GPT-5 Codex. And found that the new GitHub Copilot performed better in all 3 tasks.
Also Read: Gemini CLI vs Codex CLI: Which is a Better Coding Agent?
Conclusion
GitHub Copilot is an extraordinary advancement in AI-powered coding. It is good at turning natural language prompts into functional, polished realizations in a very short amount of time. Whether making a highly interactive 2D game with nice graphics and smooth animations, creating a dynamically updating dashboard with Chart.js visualizations and bright colors, or orchestrating a structured workflow for sentiment analysis complete with reliable measures and helpful visualizations, Copilot has output clear, trustworthy, and production-ready solutions from natural language prompts.
Unlike other tools that may excel in speed, structure, or specialized use cases. Copilot does all of these while producing clean, logically based, and usability-centered outputs that are appropriate for any domain, making Copilot an extremely flexible and practical coding assistant.
![]()
Hello! I’m Vipin, a passionate data science and machine learning enthusiast with a strong foundation in data analysis, machine learning algorithms, and programming. I have hands-on experience in building models, managing messy data, and solving real-world problems. My goal is to apply data-driven insights to create practical solutions that drive results. I’m eager to contribute my skills in a collaborative environment while continuing to learn and grow in the fields of Data Science, Machine Learning, and NLP.
Login to continue reading and enjoy expert-curated content.